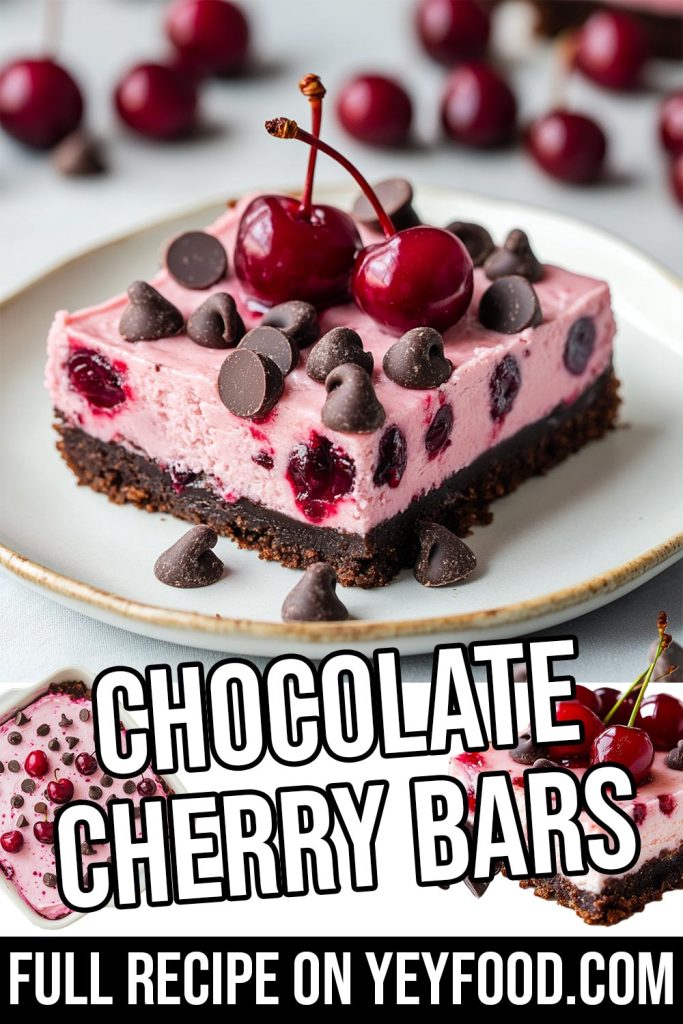
Chocolate Cherry Bars

The first time I made these Chocolate Cherry Bars, I was searching for a dessert that was both easy to throw together and impressive enough to bring to a family gathering. Little did I know, this would quickly become a staple in our home!
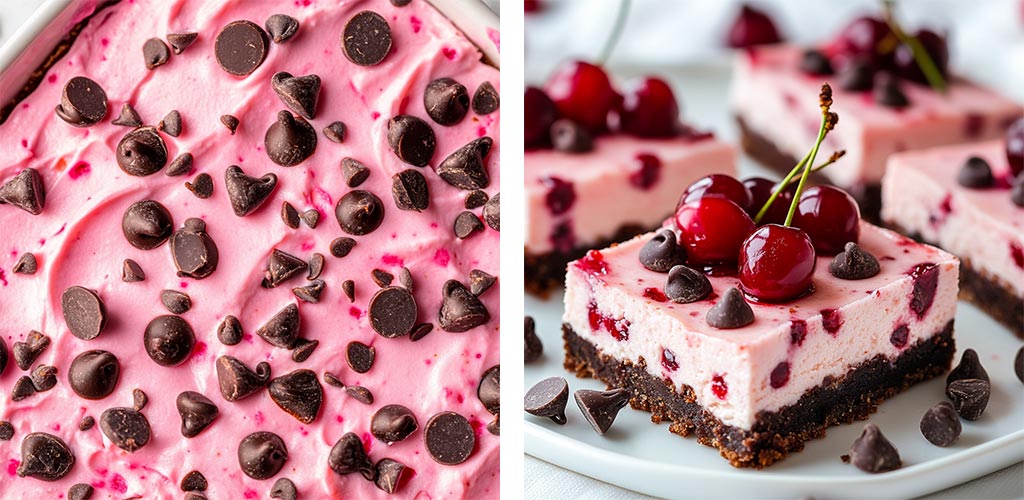
My kids adore anything with chocolate, and I love how the tartness of cherries balances the sweetness in this recipe. Plus, let’s be honest; there’s nothing quite like that creamy, dreamy cherry filling layered over a chocolatey crust and sprinkled with mini chocolate chips. It’s one of those recipes that makes you feel like you spent hours in the kitchen when, in reality, it comes together in no time.
Whenever I serve these, they disappear in minutes. I’ve even had friends ask me for the recipe before they’ve finished their first bite! These bars are perfect for busy moms who want to whip up something special without a ton of effort. Whether you need a quick dessert for a party, a school function, or just to satisfy a sweet craving, Chocolate Cherry Bars will never let you down.
Questions I Often Get Asked About This Recipe

Can I use fresh cherries instead of canned?
Yes! Just pit and chop fresh cherries, then cook them down with a bit of sugar until they soften and release their juices. This will give a more natural flavor, but canned cherries work great for convenience.
Can I make this ahead of time?
Absolutely! These bars taste even better after chilling for a few hours, so making them ahead is a great idea. Just store them in the fridge until ready to serve.
Can I freeze these bars?
Yes! Wrap them tightly in plastic wrap and store them in an airtight container in the freezer for up to 3 months. Thaw in the fridge before serving.
What kind of crust works best?
I use a simple chocolate cookie crust, but you could also try an Oreo crust for an extra rich flavor.
Can I make this gluten-free?
Yes! Just substitute a gluten-free chocolate cookie base, and you’re all set.
What You Need to Make Chocolate Cherry Bars

Ingredients:
2 cups chocolate cookie crumbs
1/2 cup melted butter
1 (8-ounce) package cream cheese, softened
1/2 cup powdered sugar
1 (21-ounce) can cherry pie filling
1 (8-ounce) container whipped topping (or homemade whipped cream)
1/2 teaspoon vanilla extract
1 cup mini chocolate chips
Special Equipment:
9×13-inch baking dish
Mixing bowls
Electric mixer
Spatula
How to Make Chocolate Cherry Bars

Prepare the Crust. In a medium bowl, mix the chocolate cookie crumbs and melted butter until well combined. Press the mixture firmly into the bottom of a greased 9×13-inch baking dish. Chill in the refrigerator while preparing the filling.
Make the Cream Cheese Layer. In a large bowl, beat the cream cheese, powdered sugar, and vanilla extract until smooth and creamy. Gently fold in the whipped topping until fully combined.
Assemble the Layers. Spread the cream cheese mixture evenly over the chilled crust. Then, spoon the cherry pie filling over the top and spread it out.
Add the Toppings. Sprinkle mini chocolate chips over the cherry layer for extra crunch and chocolatey goodness.
Chill and Serve. Refrigerate the bars for at least 2 hours before slicing and serving.
Tips for Making the Best Chocolate Cherry Bars

Use High-Quality Ingredients. The better the chocolate and cherries, the better your bars will taste.
Chill for Best Results. Allowing the bars to set in the fridge makes them easier to slice and enhances the flavors.
Try Different Toppings. Swap mini chocolate chips for white chocolate shavings or even chopped nuts for a twist.
Make it Extra Fancy. Drizzle melted chocolate over the top for an elegant touch.
Reader Reviews
⭐⭐⭐⭐⭐ “This recipe was a HIT at my daughter’s bake sale! So easy and delicious.” – Amanda M.
⭐⭐⭐⭐ “Great flavor, but I think I’ll add a bit more cherry filling next time!” – Jake R.
⭐⭐⭐⭐⭐ “Absolutely delicious! My family asked me to make it again next weekend.” – Sarah L.
⭐⭐⭐ “Tastes great, but I found the crust a bit crumbly. Maybe I’ll add more butter next time.” – Lisa B.
⭐⭐⭐⭐⭐ “Perfect for a quick dessert. My kids loved it!” – Heather T.
Printable Recipe
Before you print the recipe, could I ask you a favor? Please consider sharing this recipe on Facebook or pin to a group on Pinterest? This would really help us out. Thank you so much <3

Chocolate Cherry Bars
Chocolate Cherry Bars are a dreamy dessert with layers of chocolate cookie crust, creamy filling, sweet cherries, and mini chocolate chips. Perfect for parties or a quick sweet treat!
Ingredients
- 2 cups chocolate cookie crumbs
- 1/2 cup melted butter
- 1 (8-ounce) package cream cheese, softened
- 1/2 cup powdered sugar
- 1 (21-ounce) can cherry pie filling
- 1 (8-ounce) container whipped topping (or homemade whipped cream)
- 1/2 teaspoon vanilla extract
- 1 cup mini chocolate chips
- Special Equipment:
- 9x13-inch baking dish
- Mixing bowls
- Electric mixer
- Spatula
Instructions
- Prepare the Crust – In a medium bowl, mix the chocolate cookie crumbs and melted butter until well combined. Press the mixture firmly into the bottom of a greased 9x13-inch baking dish. Chill in the refrigerator while preparing the filling.
- Make the Cream Cheese Layer – In a large bowl, beat the cream cheese, powdered sugar, and vanilla extract until smooth and creamy. Gently fold in the whipped topping until fully combined.
- Assemble the Layers – Spread the cream cheese mixture evenly over the chilled crust. Then, spoon the cherry pie filling over the top and spread it out.
- Add the Toppings – Sprinkle mini chocolate chips over the cherry layer for extra crunch and chocolatey goodness.
- Chill and Serve – Refrigerate the bars for at least 2 hours before slicing and serving.
If you enjoyed this recipe, please share it on your social media! I would love for more people to try this delicious and easy-to-make recipe. If you have any questions or feedback, please feel free to leave a comment below. I would love to hear from you! Shhh… Join our secret foodie group on Facebook
Crockpot White Russians
Crockpot Meatballs In Onion Gravy
Crockpot Apple Cider