Christmas Cherry Bars

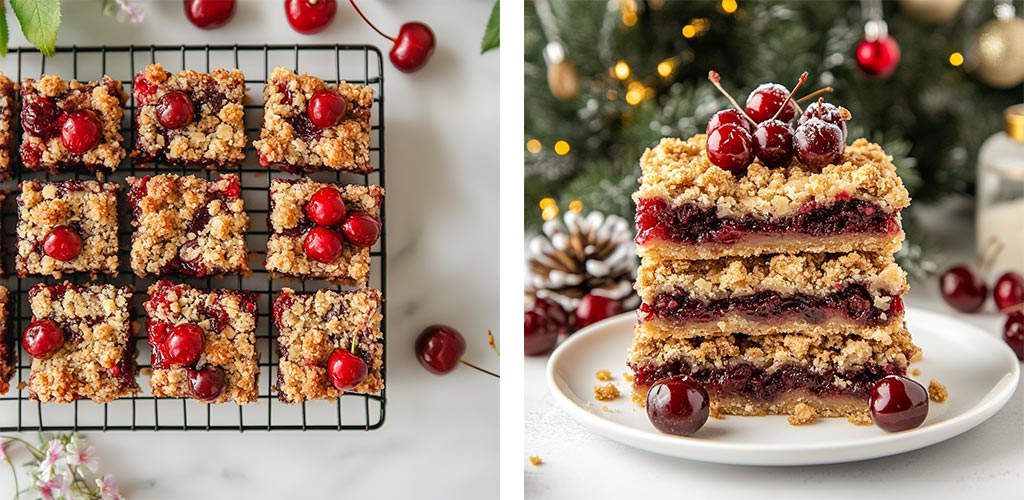
Every year, as the holiday season rolls around, my kitchen transforms into a festive wonderland. Among the many cherished recipes that make an appearance, these Christmas Cherry Bars hold a special place in my heart. It all started when my kids came home from school one chilly December afternoon, and I wanted to bake something warm, fruity, and absolutely irresistible. Little did I know, this dessert would become the star of our family gatherings!
What I love most about this recipe is how the tartness of the cherries perfectly balances the creamy, buttery layers. It’s the kind of dessert that’s indulgent yet not too heavy; just right for the holidays. My husband says it reminds him of the treats his grandmother used to make, and the kids? Well, they rarely let these bars cool before sneaking a bite.
This recipe isn’t just about the flavors; it’s about the memories. From the moment I slice into these bars and see those ruby-red cherries glisten, I know I’ve made something magical. Whether you’re hosting a holiday dinner or just need a sweet treat for a cozy night in, these Christmas Cherry Bars will never disappoint. And trust me, your family and friends will ask for seconds (and the recipe, too!).
Questions I Often Get Asked About This Recipe:

Can I use fresh cherries instead of canned cherry pie filling?
Yes! If you prefer fresh cherries, you can cook them down with sugar and cornstarch to create your own filling. It takes a bit more time but is worth the effort.
Can I freeze these bars?
Absolutely. Just wrap them tightly in plastic wrap and store them in an airtight container. They’ll stay fresh for up to two months.
What’s the best way to cut these bars cleanly?
Use a sharp knife and wipe it clean after each cut. You can even refrigerate the bars before slicing for sharper edges.
Can I use a different fruit filling?
Of course! Blueberry or raspberry filling works beautifully, too.
Are these bars gluten-free?
Not as written, but you can use a gluten-free flour blend to make them suitable for gluten-sensitive friends and family.
What You Need to Make Christmas Cherry Bars:

Ingredients:
2 cups all-purpose flour
1 cup unsalted butter, softened
½ cup granulated sugar
1 teaspoon vanilla extract
1 (21-ounce) can cherry pie filling
1 (8-ounce) package cream cheese, softened
1 large egg
1 teaspoon almond extract
¾ cup powdered sugar
Equipment:
9×13-inch baking dish
Mixing bowls
Electric mixer
Spatula
Sharp knife for slicing
How to Make It:

Prepare the Crust: Preheat your oven to 350°F (175°C). In a mixing bowl, combine flour, softened butter, granulated sugar, and vanilla extract. Mix until crumbly. Press ⅔ of the mixture into a greased 9×13-inch baking dish to form the crust.
Bake the Base: Bake the crust for 10-12 minutes, or until lightly golden. Set aside to cool slightly.
Prepare the Filling: Beat the cream cheese, egg, powdered sugar, and almond extract until smooth and creamy.
Layer the Bars: Spread the cream cheese mixture evenly over the crust. Spoon the cherry pie filling on top, ensuring even coverage. Sprinkle the remaining crust mixture on top.
Bake Again: Return the dish to the oven and bake for 25-30 minutes, or until the top is lightly golden and the filling is set.
Cool and Serve: Allow the bars to cool completely before slicing into squares. Enjoy with a warm cup of tea or coffee!
Tips:

Chill Before Slicing: Refrigerating the bars for an hour makes them easier to cut into neat squares.
Add a Citrus Twist: Grate a little lemon or orange zest into the cream cheese layer for a burst of freshness.
Make It Festive: Sprinkle powdered sugar on top for a snow-dusted effect.
Double the Recipe: Hosting a large party? This recipe doubles easily!
Latest Reviews:

⭐️⭐️⭐️⭐️⭐️ “Absolutely amazing! My kids devoured these in minutes. Will definitely make again!” Sarah M.
⭐️⭐️⭐️⭐️ “Loved the flavors, but I’ll add a bit more cream cheese filling next time.” Laura K.
⭐️⭐️⭐️⭐️⭐️ “Perfect for Christmas! My guests couldn’t stop raving about these bars.” Michelle P.
⭐️⭐️⭐️⭐️ “Easy to make and delicious. I used blueberry filling instead, and it was a hit!” David L.
⭐️⭐️⭐️⭐️⭐️ “These bars are now a holiday tradition in our house. Thanks for sharing!” Emily R.
Printable Recipe:

Before you print the recipe, could I ask you a favor? Please consider sharing this recipe on Facebook or pin to a group on Pinterest? This would really help us out. Thank you so much <3

Christmas Cherry Bars
These Christmas Cherry Bars are the perfect holiday dessert! With a buttery crust, creamy filling, and tart cherry topping, they’re festive, easy to make, and utterly delicious.
Ingredients
- 2 cups all-purpose flour
- 1 cup unsalted butter, softened
- ½ cup granulated sugar
- 1 teaspoon vanilla extract
- 1 (21-ounce) can cherry pie filling
- 1 (8-ounce) package cream cheese, softened
- 1 large egg
- 1 teaspoon almond extract
- ¾ cup powdered sugar
- Equipment:
- 9x13-inch baking dish
- Mixing bowls
- Electric mixer
- Spatula
- Sharp knife for slicing
Instructions
- Prepare the Crust: Preheat your oven to 350°F (175°C). In a mixing bowl, combine flour, softened butter, granulated sugar, and vanilla extract. Mix until crumbly. Press ⅔ of the mixture into a greased 9x13-inch baking dish to form the crust.
- Bake the Base: Bake the crust for 10–12 minutes, or until lightly golden. Set aside to cool slightly.
- Prepare the Filling: Beat the cream cheese, egg, powdered sugar, and almond extract until smooth and creamy.
- Layer the Bars: Spread the cream cheese mixture evenly over the crust. Spoon the cherry pie filling on top, ensuring even coverage. Sprinkle the remaining crust mixture on top.
- Bake Again: Return the dish to the oven and bake for 25–30 minutes, or until the top is lightly golden and the filling is set.
- Cool and Serve: Allow the bars to cool completely before slicing into squares. Enjoy with a warm cup of tea or coffee!
If you enjoyed this recipe, please share it on your social media! I would love for more people to try this delicious and easy-to-make recipe. If you have any questions or feedback, please feel free to leave a comment below. I would love to hear from you! Shhh… Join our secret foodie group on Facebook
Crockpot White Russians
Crockpot Meatballs In Onion Gravy
Crockpot Apple Cider


