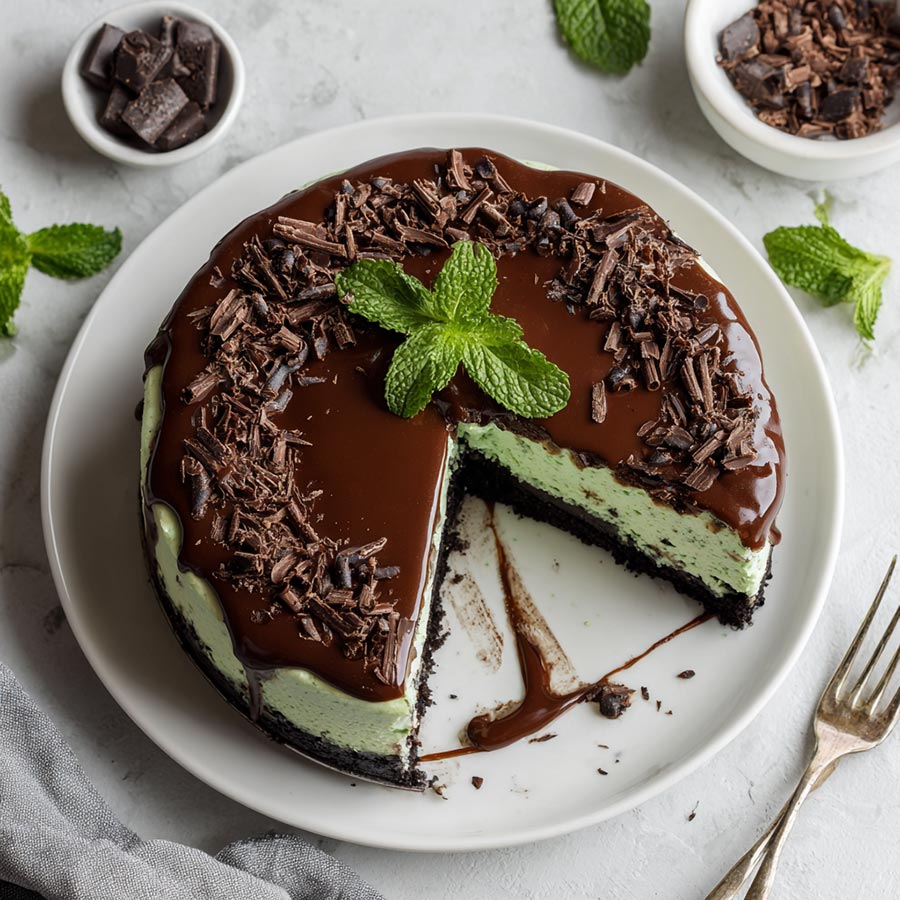
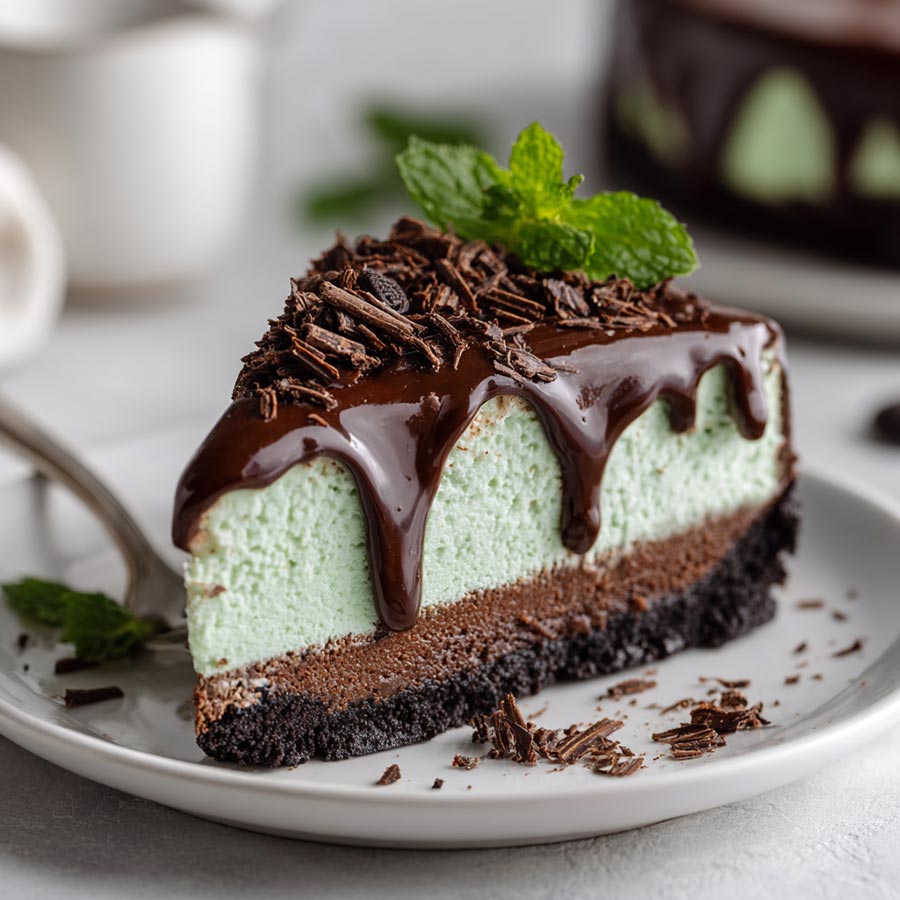
Mint Chocolate Cheesecake
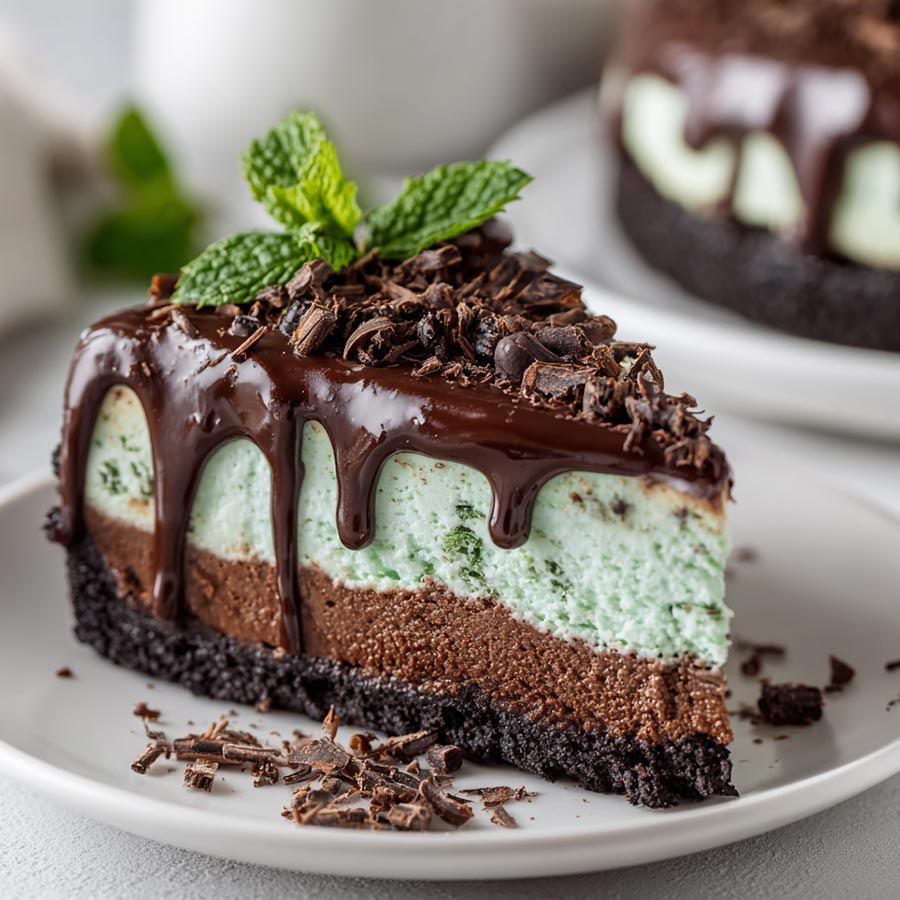
There’s something magical about the combination of cool mint and rich chocolate, especially when it’s swirled into a creamy, decadent cheesecake. This Mint Chocolate Cheesecake has quickly become a staple in our household for celebrations, potlucks, and those “just because” kind of days.
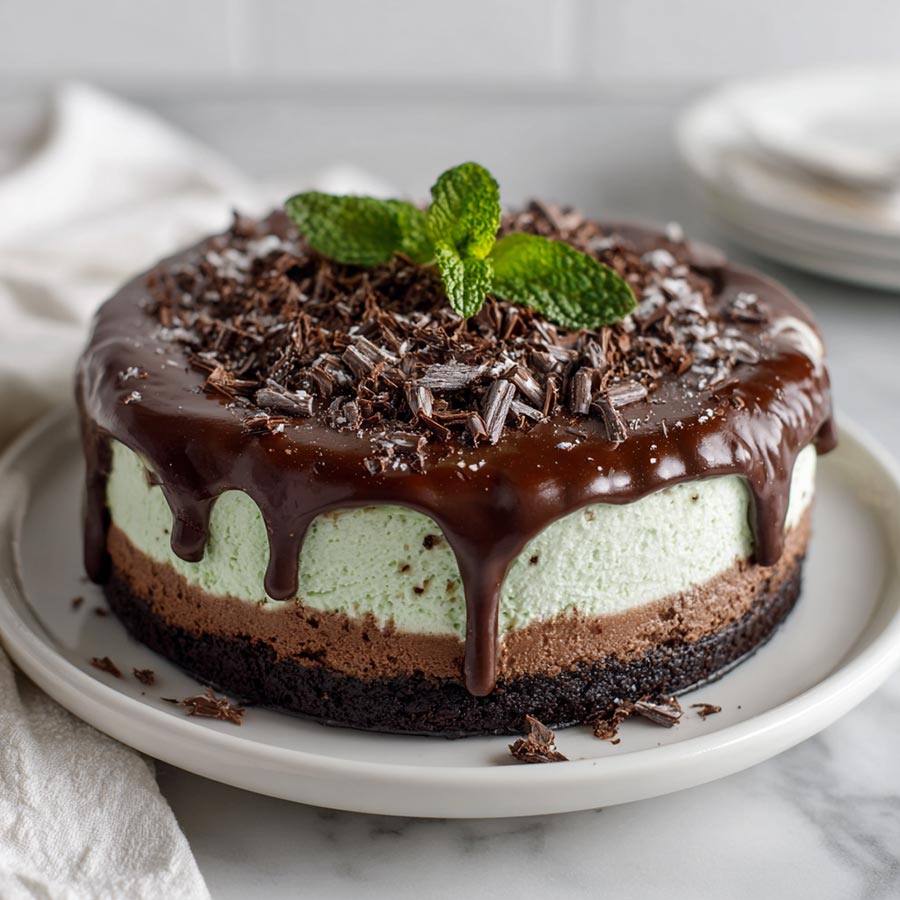
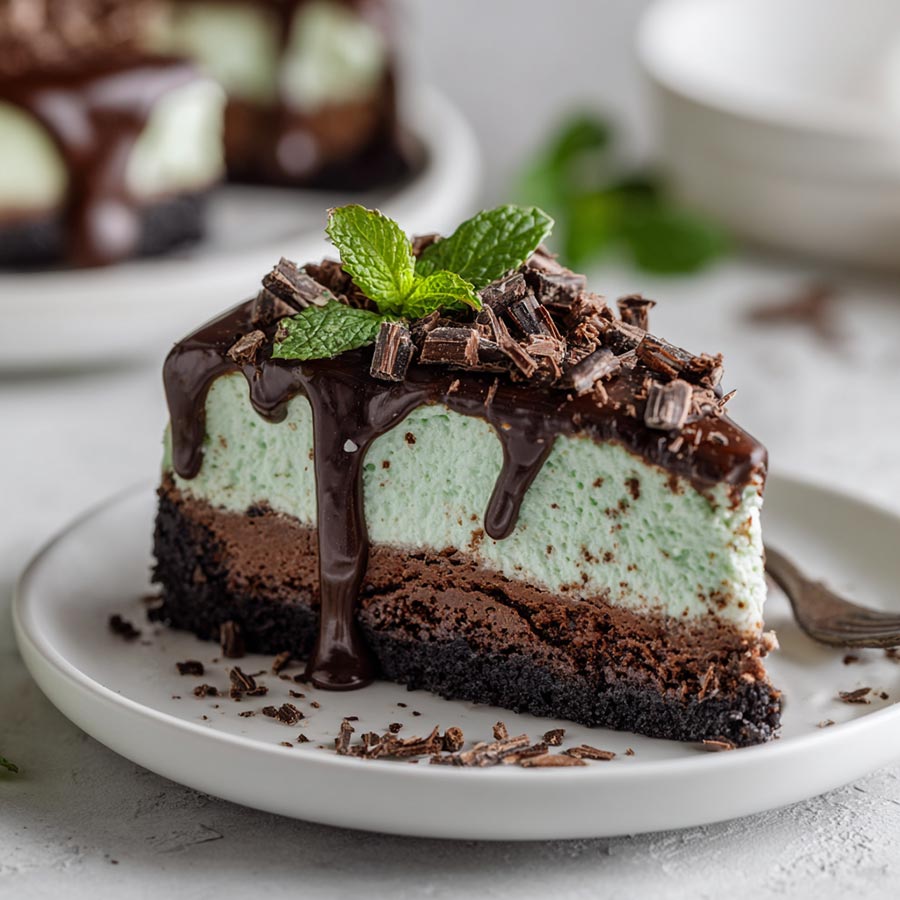
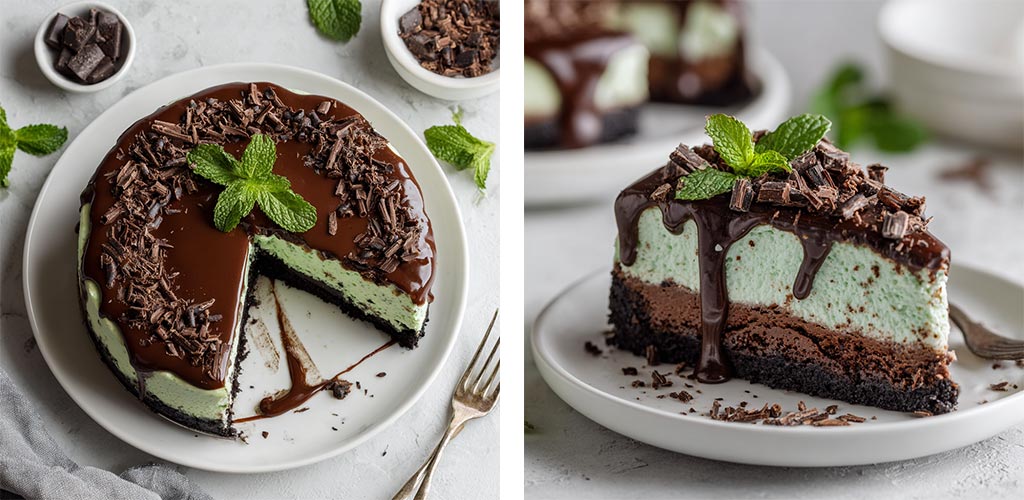
I first made this for a family birthday after realizing our usual chocolate cake needed a refresh. What I didn’t expect was how much everyone would fall head over heels for this dessert. The way the mint layer balances the richness of the chocolate, and that perfectly crisp Oreo crust… it’s a showstopper.
What really sold me was how make-ahead friendly it is. As a busy mom, I love recipes I can prep the night before. And when you bring this cheesecake out of the fridge, topped with silky ganache, minty whipped cream, and a shower of chocolate shavings, it genuinely looks like it came from a fancy bakery. But it’s made with love, right at home.
The kids are obsessed (it reminds them of mint-chocolate chip ice cream), and my husband now requests it every Father’s Day. It’s also been the talk of more than one bake sale! I’ve even been told by a neighbor, “That was the best cheesecake I’ve ever had.” Comments like that make the effort totally worth it. So if you’re craving a dessert that feels special but isn’t overly complicated, this one’s a winner. Cool, creamy, and chocolatey, it checks every box.
Questions I Often Get Asked About This Recipe
Can I make this ahead of time?
Yes! This cheesecake is actually best when chilled overnight, making it a perfect make-ahead dessert.
Do I need a water bath?
No water bath is required! This cheesecake sets up beautifully with a slightly denser texture, thanks to the chocolate and mint layers.
What kind of mint extract should I use?
Use peppermint extract, not spearmint or mint flavoring. Peppermint gives the classic mint-chocolate taste you’re aiming for.
Can I freeze leftovers?
Absolutely. Wrap slices tightly in plastic wrap and freeze for up to 1 month. Let them thaw in the fridge overnight before serving.
Do I need to use food coloring?
It’s optional. The green hue adds visual appeal, but if you prefer to skip the dye, it will still taste just as delicious.
What You Need to Make Mint Chocolate Cheesecake
For the Oreo Crust:
24 Oreo cookies
6 tbsp unsalted butter, melted
For the Chocolate Cheesecake Layer:
16 oz (2 blocks) cream cheese, softened
1/2 cup granulated sugar
1/4 cup sour cream
2 large eggs
1 tsp vanilla extract
6 oz semi-sweet chocolate, melted and slightly cooled
For the Mint Cheesecake Layer:
16 oz (2 blocks) cream cheese, softened
1/2 cup granulated sugar
1/4 cup sour cream
2 large eggs
1 tsp peppermint extract
Green food coloring (optional)
For the Ganache Topping:
3/4 cup heavy cream
6 oz semi-sweet chocolate, chopped
Optional Garnishes:
Whipped cream (plain or mint flavored)
Shaved chocolate or chocolate curls
Fresh mint sprigs
Special Tools:
9-inch springform pan
Electric mixer
Offset spatula or silicone scraper
How to Make Mint Chocolate Cheesecake
Prep the Crust:
Preheat your oven to 325°F (160°C). In a food processor, pulse Oreos into fine crumbs. Stir in melted butter, then press the mixture firmly into the bottom of a 9-inch springform pan. Bake for 10 minutes, then set aside to cool.
Make the Chocolate Cheesecake Layer:
Beat softened cream cheese until smooth. Add sugar, sour cream, eggs, and vanilla. Mix until fully combined. Fold in melted chocolate. Pour over the cooled crust and smooth the top.
Prepare the Mint Layer:
In a clean bowl, beat cream cheese until fluffy. Add sugar, sour cream, eggs, and peppermint extract. Mix until smooth. Stir in a few drops of green food coloring if using. Gently spoon over the chocolate layer and smooth the top.
Bake:
Bake the cheesecake at 325°F for 55–60 minutes or until edges are set but the center still jiggles slightly. Turn off the oven and crack the door open. Let the cheesecake sit for 1 hour before refrigerating.
Chill:
Refrigerate at least 6 hours or overnight.
Make Ganache:
Heat heavy cream just until simmering. Pour over chopped chocolate, let sit for 2 minutes, then stir until smooth. Pour over chilled cheesecake and spread evenly.
Decorate:
Pipe on whipped cream, sprinkle with chocolate shavings, and garnish with mint leaves if desired.
Tips for Making the Best Mint Chocolate Cheesecake
Room temperature ingredients help ensure a silky smooth filling, don’t skip this step!
For clean slices, wipe your knife clean between each cut with a warm, damp cloth.
Don’t rush the chilling time. This cheesecake tastes even better the next day!
Want to switch it up? Use chocolate graham crackers or even mint Oreos for the crust.
If you don’t have a springform pan, line a deep 9-inch cake pan with parchment for easy lifting.
Reader Reviews
⭐️⭐️⭐️⭐️⭐️ “This cheesecake was an absolute hit at my daughter’s birthday! Everyone asked for the recipe. Definitely making it again.” – Emily T.
⭐️⭐️⭐️⭐️⭐️ “I love how the mint isn’t overpowering, it’s just right. The layers turned out gorgeous, and it tasted even better than it looked!” – Melissa J.
⭐️⭐️⭐️⭐️ “It was delicious, but the ganache didn’t set quite right for me. Next time I might use a bit less cream.” – Jason P.
⭐️⭐️⭐️⭐️⭐️ “Perfect make-ahead dessert. I served it for Christmas dinner and it was gone in minutes. The chocolate crust is divine!” – Lauren M.
⭐️⭐️⭐️⭐️ “Really good flavor and easy to follow directions. I might add crushed peppermint on top next time for extra crunch.” – Hannah K.
Printable Recipe
Before you print the recipe, could I ask you a favor? Please consider sharing this recipe on Facebook or pin to a group on Pinterest? This would really help us out. Thank you so much <3

Mint Chocolate Cheesecake
This Mint Chocolate Cheesecake is a stunning, layered dessert featuring a crisp Oreo crust, rich chocolate cheesecake base, and a refreshing mint layer—all topped with silky ganache and garnished with whipped cream and chocolate curls. Perfect for holidays or special occasions, it’s easy to make ahead and always impresses.
Ingredients
- For the Oreo Crust:
- 24 Oreo cookies
- 6 tbsp unsalted butter, melted
- For the Chocolate Cheesecake Layer:
- 16 oz (2 blocks) cream cheese, softened
- 1/2 cup granulated sugar
- 1/4 cup sour cream
- 2 large eggs
- 1 tsp vanilla extract
- 6 oz semi-sweet chocolate, melted and slightly cooled
- For the Mint Cheesecake Layer:
- 16 oz (2 blocks) cream cheese, softened
- 1/2 cup granulated sugar
- 1/4 cup sour cream
- 2 large eggs
- 1 tsp peppermint extract
- Green food coloring (optional)
- For the Ganache Topping:
- 3/4 cup heavy cream
- 6 oz semi-sweet chocolate, chopped
- Optional Garnishes:
- Whipped cream (plain or mint flavored)
- Shaved chocolate or chocolate curls
- Fresh mint sprigs
- Special Tools:
- 9-inch springform pan
- Electric mixer
- Offset spatula or silicone scraper
Instructions
- Prep the Crust: Preheat your oven to 325°F (160°C). In a food processor, pulse Oreos into fine crumbs. Stir in melted butter, then press the mixture firmly into the bottom of a 9-inch springform pan. Bake for 10 minutes, then set aside to cool.
- Make the Chocolate Cheesecake Layer: Beat softened cream cheese until smooth. Add sugar, sour cream, eggs, and vanilla. Mix until fully combined. Fold in melted chocolate. Pour over the cooled crust and smooth the top.
- Prepare the Mint Layer: In a clean bowl, beat cream cheese until fluffy. Add sugar, sour cream, eggs, and peppermint extract. Mix until smooth. Stir in a few drops of green food coloring if using. Gently spoon over the chocolate layer and smooth the top.
- Bake: Bake the cheesecake at 325°F for 55–60 minutes or until edges are set but the center still jiggles slightly. Turn off the oven and crack the door open. Let the cheesecake sit for 1 hour before refrigerating.
- Chill: Refrigerate at least 6 hours or overnight.
- Make Ganache: Heat heavy cream just until simmering. Pour over chopped chocolate, let sit for 2 minutes, then stir until smooth. Pour over chilled cheesecake and spread evenly.
- Decorate: Pipe on whipped cream, sprinkle with chocolate shavings, and garnish with mint leaves if desired.
If you enjoyed this recipe, please share it on your social media! I would love for more people to try this delicious and easy-to-make recipe. If you have any questions or feedback, please feel free to leave a comment below. I would love to hear from you! Shhh… Join our secret foodie group on Facebook
Rhubarb Meringue Pie
Tangy Lemon Tartlets
Strawberry Oatmeal Bars