Make Sweet Sticky Memories With Your Kids
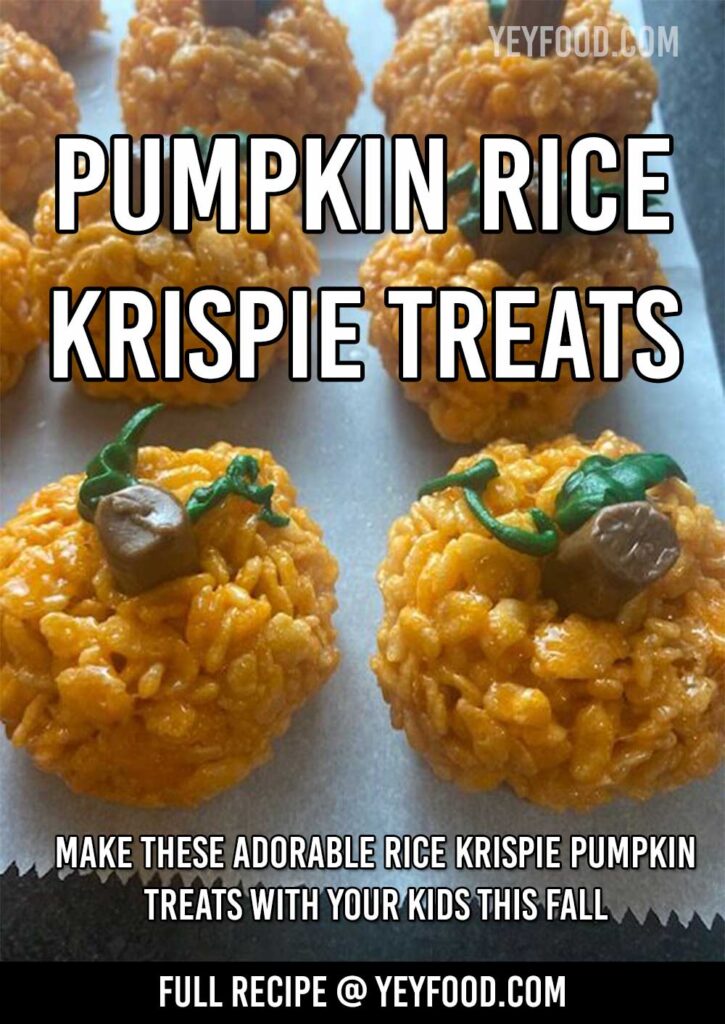
Make these adorable pumpkin rice krispie treats with your kids this fall. I know what you’re thinking; ack, what a mess, but trust this grandma when I tell you the mess doesn’t last long, but the love and memories do, and it is so worth it!
When our girls were little, we spent one Sunday in December making and decorating cut-out sugar cookies. It might have been the closest we ever came to being reported to the board of health with icing and sticky fingers everywhere.
The kitchen table was a disaster, and the cookies would never have cut it on Pinterest, but it made million-dollar memories! The memories are so wonderful; we did it every year, even when they were in college. That sticky and sacred childhood activity spawned an annual Christmas Eve morning gathering with both daughters’ families and our six grandkids.
Rice Krispie Pumpkin Treats Are Very Easy To Make
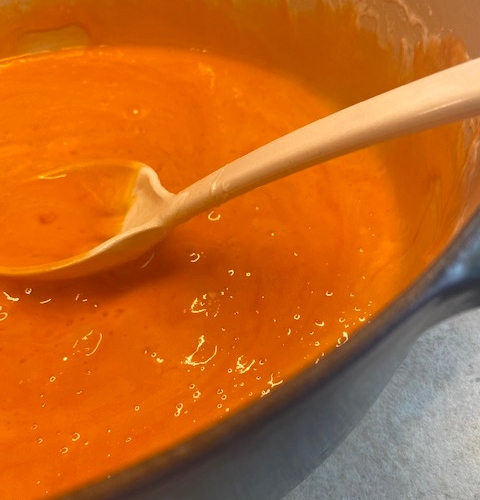
Melt a stick of butter in a large pot and when it’s melted, add one large ten-ounce or twelve-ounce bag of marshmallows and stir it together until the marshmallows melt. You can use mini marshmallows or regular-size marshmallows.
Add a teaspoon of vanilla and a half teaspoon of salt to bring out the flavor. Other recipes combine red and yellow liquid food coloring to make the marshmallow mixture turn a pumpkin orange. None of them were particular about how much of each to use.
I’m happy to have discovered AmeriColor Gel Paste Food Coloring. My friend Katie told me about it when she allowed me to post her fabulous Christmas cookie recipe here. She swears by it. Americolor has a spectacular orange color, so that’s what I used! It took ten drops for a gorgeous orange shade!
Once you try it, you may never go back, no matter what color frosting you want to make for any season! You can use it to make colored sugar, too! Here are some of the advantages of gel-type food coloring.
- It’s consistent from batch to batch.
- It won’t separate or weep and doesn’t harden.
- Has coloring strength superior to any other food color
- Does not thin the icing
- Base ingredients allow the color to disperse immediately, so you use less color.
Once you have your beautiful orange molten marshmallow mixture, stir in 6 cups of rice krispies until everything is well mixed. Take the pot off the stove and set it on a rack or heat-proof surface.
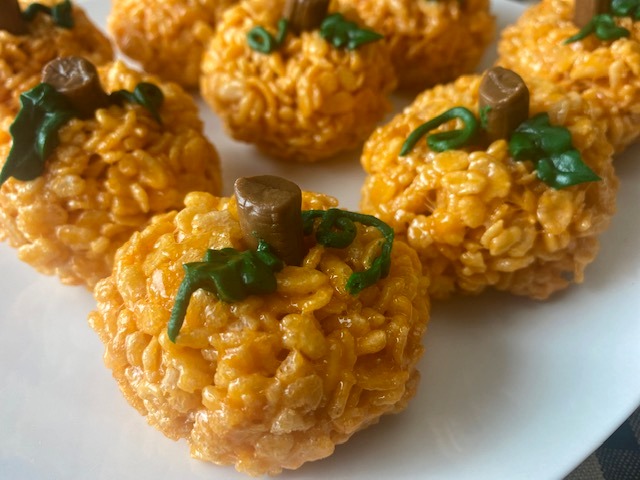
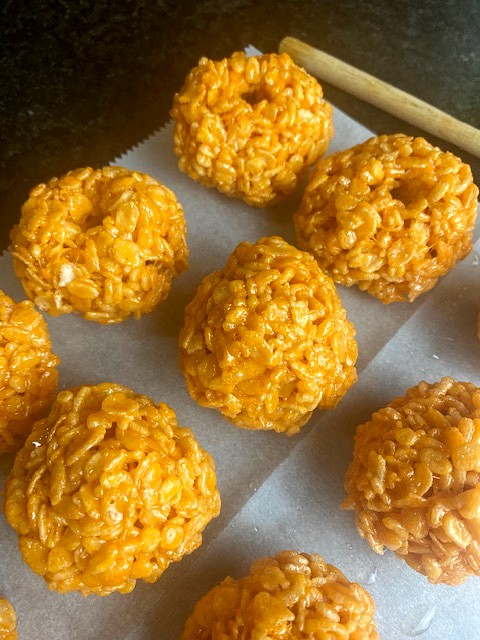
I used an ice cream scoop to form pumpkins that were fairly uniform in size. The pumpkins were about the size of a mandarin orange, and I got exactly eighteen pumpkin rice krispie treats from this batch.
You will need to put some vegetable oil or melted butter in a little dish and use it to grease your hands between each pumpkin. Rub it in like lotion, shape the mixture into balls, and pack them firmly. Set them on a sheet of parchment paper, reapply oil, and move on to the next pumpkin.
If you’re doing this with littles, someone can be in charge of making “belly buttons” in the pumpkins. The handle of a wooden spoon works very well for that. This makes the perfect spot for the tootsie roll stem. Someone else can be in charge of unwrapping the tootsie rolls!
Now push a tootsie roll in the belly button. Finally, decorate your treats easily with ready-to-use green icing in a tube. Wilton makes a great product for this! The tubes fit any standard Wilton tip and coupler. Attach your tip right to the tube, then have fun adding a leaf and tendril to all the little pumpkin rice krispie treats!
The vanilla flavor of this frosting complements the pumpkin rice krispie treats, so they will look and taste amazing, and you will have made wonderful memories with your kids, which will last lots longer than the sticky kitchen!! 💖
Do you make any special treats or candy for fall and Halloween? What fun things do you do with your kids for Halloween? Here are some of our favorites. Boozy Pumpkin Scooter Pies, Chocolate Peanut Butter Balls, Easy Pumpkin Bread.

Pumpkin Rice Krispies Treats
Here is a recipe for classic rice krispie treats with food coloring added and shaped into tasty, adorable little pumpkins for fall.
Ingredients
- 1/2 cup butter
- One 10-ounce bag of marshmallows
- 10 drops of Amerigel orange food coloring or a combination of yellow and red food coloring.
- 1 tsp vanilla
- 1/2 tsp salt
- Green decorator icing in a tube
- Mini tootsie rolls for stems
- Vegetable oil or melted butter to grease hands for shaping marshmallow mixture
Instructions
- Melt the butter in a large pot on medium heat.
- Add the marshmallows and stir until they are melted.
- Add vanilla and salt and stir well.
- Add food coloring until you achieve your desired shade of orange.
- Rremove the pot from the stove and set it on a rack or heat-resistant surface.
- Grease hands with oil or butter.
- Use a small ice cream scoop or spoon to scoop about the marshmallow mixture.
- Form the marshmallow/rice krispie mixture into balls and set on parchment paper.
- Grease hands and repeat until all the marshmallow mixture has been used.
- Make a "belly button" in each pumpkin with the handle of a wooden spoon and insert a tootsie roll.
- Use decorator icing to make a garnish of a leaf and a tendril.
- Store in an air-tight container.
More recipes from us
S’mores Bars How To Make Them Super Fast and Super Good
Wonderful Apple Cake With Cardamom and Coffee
How To Make The White BBQ Sauce That’s Fascinated Us Since 1925
German Sauerkraut Casserole With Bacon And Brown Sugar
If you like these recipes, you are our people! You can check some related articles below or search via categories on the right. But, be warned; you will be on here for hours. Enjoy!
So, please share this recipe on your social media accounts like Facebook, Instagram, Twitter, and Pinterest. We would be honored and ever so grateful; thank you!