Make A Beautiful Home Baked Cherry Braid A Gift Of Love
Years ago, when our girls were still in high school, a family friend brought us a cherry braid every year at Christmas. Valerie baked the yeast dough from scratch; we were always so tickled when she got it to our house.
It looked so perfect and so complicated I was always afraid to try it. But now that our last granddaughter is about to graduate, I thought it was high time for me to give it a whirl. She was right! It’s easier than it looks and tastes wonderful!
You can begin with frozen bread dough or puff pastry, but nothing beats homemade, from-scratch sweet enriched yeast dough for taste and presentation. I made a few minor modifications to my versatile Anything Yeast Bread Dough recipe to create a softer, richer dough with a lovely fine texture for my cherry braid.
Despite what you might think, bread baking is simple, satisfying, and inexpensive. It’s easiest if you have a stand mixer like my trusty twenty-five-year-old Kitchen Aid, but you can use a mixer and knead it by hand. I’ve included the modified, enriched sweet yeast dough recipe in this post, and the rest of the process is just fun!
Begin By Making A Batch Of Sweet Yeast Dough
I am all about making yeast bread as simple as possible. That way, you’ll want to make it often and with confidence. You can read yourself crazy looking at all the well-meaning advice online, so today, let’s stay very basic.
The single most important rule for making yeast dough is to have the water at a temperature that’s not too hot or too cold. The ideal temperature for water is about 105 to 115 degrees Fahrenheit.
“The wrist test” is the next best thing to a thermometer. The yeast will probably like it if the water feels comfy and warm, not too cool or warm on your wrist. If you ever gave a baby her 3:00 AM feeding, you tested the temperature of the baby’s bottle the same way! Yeast and wee babies like the same temperature range!
Yeast needs warm water and a bit of sugar to activate. There are two kinds of yeast, regular and quick-rise yeast. I prefer to use rapid-rise or “instant” yeast because it saves a step, so it’s about 10 minutes faster. The primary difference is that rapid-rise yeast is processed, so it has finer granules, which means you can add it right along with the flour, water, and sugar without needing to “proof” it first.
If you have active dry yeast and not quick-rise yeast, I have never seen a more well-written article about proofing yeast than this one. Read it, and you will know everything you need to know!
I bake yeast bread a lot, so I buy yeast in bulk. I store it in the freezer until I open it, then in a tightly sealed jar in the refrigerator. Yeast kept in the freezer lasts indefinitely. If you have old yeast packets stashed in a cupboard somewhere, check the expiration date before launching a batch of bread. If in doubt, proof it as described in the link above; if it flops, replace it.
Step By Step Directions For Making Yeast Dough
Put warm milk, yeast, sugar, salt, and butter in the mixer bowl and add a cup of flour. Using the whip attachment, mix thoroughly, scraping down the sides of the bowl occasionally.
Add the egg and two 2 cups of flour, one at a time, and beat well. Keep the mixer draped with a clean dishtowel for the next step to stop runaway flour from escaping.
Switch to the dough hook and add flour gradually until the hook starts pulling the dough away from the sides of the bowl. Stop the mixer from time to time and feel the dough. If it’s still sticky, add a tablespoon or so of flour at a time and resume kneading with the dough hook.
Stop adding flour when the dough is soft but handles without sticking to your fingers. Great bread dough should feel satiny, elastic, and smooth as a baby’s cheek. Remove the dough hook and gather the dough into a ball.
Oil or spray the bowl generously with non-stick spray and return the dough to the bowl. It’s not necessary to wash it before you do. Smooth a little cooking oil or olive oil over the dough, cover the bowl with a dishtowel and set it in a nice warm place to rise for about an hour. When the dough has doubled, you are ready to make your braid.
After filling and braiding, the dough needs to rise again until it doubles in size, and this second rise will take less time.
Ready To Fill And Braid The Dough Into A Cherry Braid
Divide the dough in half and roll each piece of dough out to a rectangle about ten by fifteen inches. Line a rimmed baking pan with parchment paper or grease it well and move the rectangle onto the baking sheet.
I found this was easiest to do by rolling the dough over my rolling pin and unrolling it onto the baking sheet. You may need to ease the dough into a more uniform rectangular before moving on to the next step.
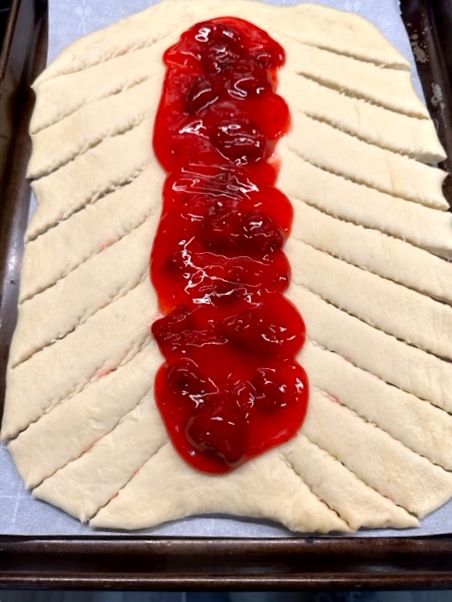
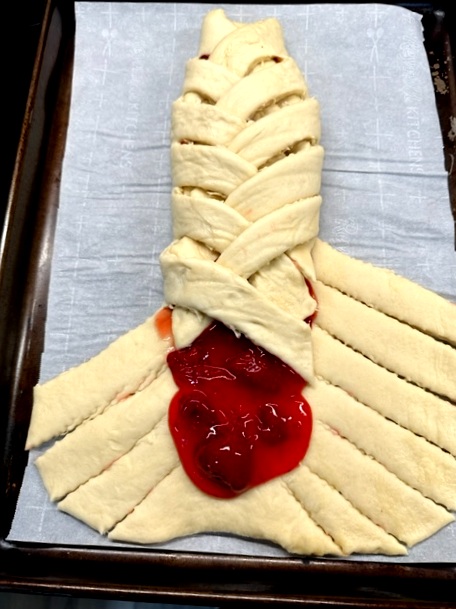
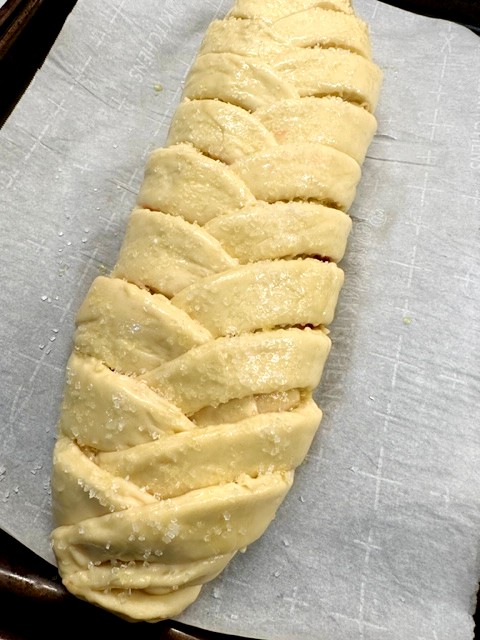
Stir a teaspoon of almond extract into a can of cherry pie filling and spread one-half of the can down the center third of the rectangle. Cut strips diagonally (think Christmas tree branches) and begin braiding by crossing the dough over the cherry filling, alternating left, and right.
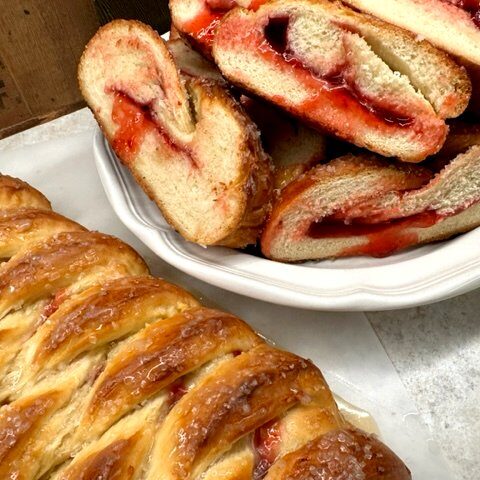
If you have a sharp eye, you might catch that I opened a can of strawberry pie filling by mistake, but I used it, and it tasted great! Next time, I might even try apricot or apple pie filling.
Keep going until you get to the bottom of the cherry braid, and pinch and tuck any ends into place. On the first one, I made the mistake of cutting straight out from the center instead of diagonally, which didn’t make a neat braid. Learn from me!
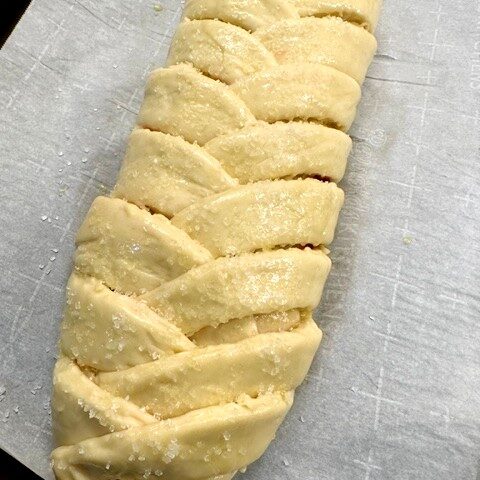
When you have everything neatly braided and tucked in place, brush the cherry braid with an egg wash using a whole egg with a bit of water whisked in. This will produce a lovely shiny brown crust. While wet, you can sprinkle colored sugar, sliced almonds, or coarse sanding sugar like I did for an extra pretty top.
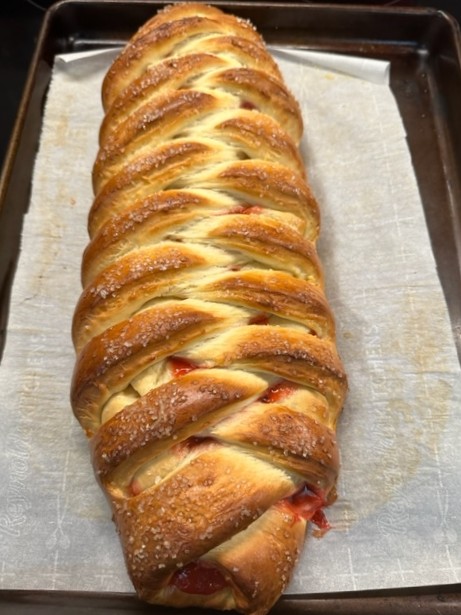
Let the braid rise until doubled in size, and bake in a 350-degree oven for about 30 minutes or until the crust is a beautiful golden brown. Cool completely, and add a powdered sugar glaze and garnish if desired. Make sure the braid is completely cool before slicing it.
Yeast dough is really fun to work with with a little practice, and you’ll make more friends than you can imagine when you share home-baked treats like my Best Butteriest Cinnamon Rolls!
We love giving baked goods to all kinds of folks on our Christmas list. Here are some of our most popular bread and quickbread recipes. Easy Cinnamon Bread, Easy Pumpkin Bread, Apple Cider Donut Mini Loaves, Jamaican Style Banana Bread. What are your favorites?
Printable Recipes:
Basic Enriched Yeast Dough
Here is a recipe for an enriched sweet roll dough that has a soft, tender crust and a fine texture.
Ingredients
- 2 cups very warm milk, about 110 degrees, approximately the temperature of bathwater. You can also use half milk and half water.
- 5 tsp yeast or two packets
- 1/3 cup butter softened
- 2 tsp salt
- 1/2 cup sugar
- 6 cups flour, approximately
- 2 eggs at room temperature. One for the dough, the second egg for an egg wash.
Instructions
- Put warm milk, yeast, sugar, salt, and butter in the mixer bowl and add a cup of flour. Using the whip attachment, mix thoroughly, scraping down the sides of the bowl occasionally.
- Hint: grab a clean dish towel and wrap it around the bowl. That is unless you enjoy cleaning up flour. (I don't.)
- Add one egg and 2 cups of flour, one at a time, and beat well. Keep the mixer draped for the next step.
- Switch to a dough hook and add flour gradually until the hook pulls the dough away from the sides of the bowl.
- Stop the mixer and feel the dough. If it's still sticky, add a tablespoon or so of flour at a time and resume kneading with the dough hook.
- Stop adding flour when it's soft but handles without sticking to your fingers. Great bread dough should feel satiny and elastic.
- Remove the dough hook and gather the dough into a ball.
- Spray the bowl generously with non-stick spray and return the dough to the bowl. It's not necessary to wash it before you do.
- Smooth a little cooking oil or olive oil over the dough, cover the bowl with a dish towel and set it in a nice warm place to rise for about an hour.
- When the dough has doubled in size, shape it into whatever you want.
- For a crisp, shiny crust, beat the egg with a bit of water and brush it over the dough BEFORE baking. (If you want a softer crust, brush the dough with melted butter AFTER baking.)
- The dough will need to rise again until doubled in size after shaping it. The second rise will be quicker than the first one.
- Bake in a 350-degree oven. The time in the oven depends on what you are making—usually 30 to 40 minutes.
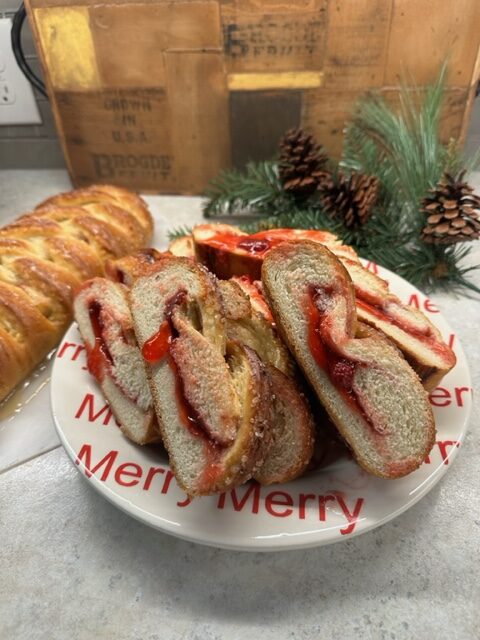
Beautiful Cherry Braid
This is a showy but deceptively simple fruit-filled yeast braid using an enriched sweet roll dough.
Ingredients
- One recipe of Enriched Sweet Roll Dough
- One 21-ounce can of cherry pie filling, or your choice of fruit pie filling
- 1 tsp almond extract, optional.
- One egg, beaten with a teaspoon or two of water for an egg wash.
- Colored sugar, sliced almonds, sanding sugar as desired for garnish
- Powdered sugar icing for garnish, if desired.
Instructions
- Divide the dough in half and roll each part into a rectangle approximately 10" by 15".
- Place the dough rectangle on well-greased or parchment-lined baking sheets.
- Spread one-half can of pie filling down the center third of each dough rectangle.
- Cut strips approximately 1" wide diagonally on each side of the filling.
- Beginning at the top, braid the dough working left-right-left right until the bottom of the rectangle is reached.
- Tuck in any loose ends and pinch into place. See the post for photos.
- Repeat for the second rectangle.
- Brush the braid with an egg wash and sprinkle with sugar or almonds as desired.
- Let rise until double, about 30 minutes, but this can vary depending on room temperature.
- Bake at 350 degrees for about 30 minutes or until the crust is golden brown and the braid sounds hollow when you tap on the bottom.
- Add a powdered sugar glaze after cooling if desired, and wait until the braid is completely cool before slicing.
If you enjoyed this recipe, please share it on your social media! I would love for more people to try this delicious and easy-to-make dessert. If you have any questions or feedback, please feel free to leave a comment below. I would love to hear from you! Shhh… Join our secret foodie group on Facebook.
MORE OF OUR QUICK AND EASY FAMILY-STYLE RECIPES:
The Ultimate Bread and Butter Pickle Recipe
Danish Style Cucumber Salad
Rustic Rhubarb Bread
Oven-Baked Steak With Brown Gravy
If you like these recipes, you are our people! You can check some related articles below or search via categories on the right. But, be warned; you will be on here for hours. Enjoy!