Make Rustic Bread With No Mixer No Kneading
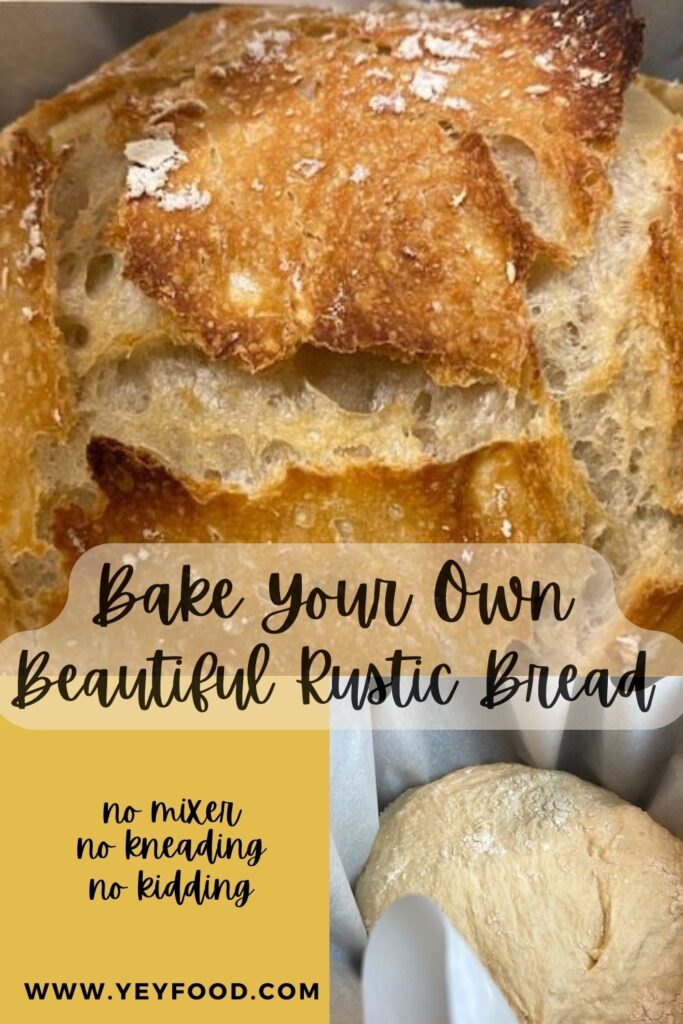
When you go to a fancy bakery or bread shop, a gorgeous rustic loaf of bread like this one might have a price tag of $5.00 or more. Why not bake it yourself at home for pennies and enjoy the amazing fragrance of yeast bread in every corner of your house while you do? It’s ridiculously easy!
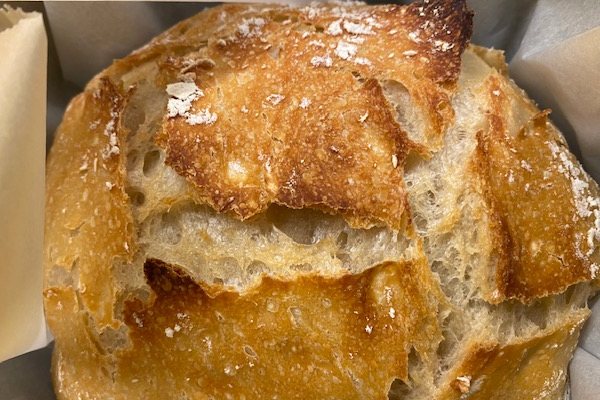
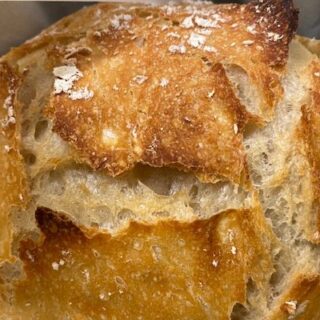
The crispy crust and chewy middle were born to dunk in soup, slather with butter, or top with a thin slice of sharp cheddar cheese. This bread is incredible, but best of all, it’s incredibly easy to do!
I was shocked by the outstanding results, even on my very first attempt!
Start It Tonight You Can Have A Perfectly Baked Rustic Loaf Tomorrow
All you need is a bowl, a spoon, and four ingredients to make the dough. While you are doing dishes or before you go to bed, stir up a batch. Once you’ve mixed up the ingredients, cover the bowl tightly with plastic film.
Then, the dough can sit on the counter and wait for 8 hours or up to 24 hours until you are ready to bake it! The slow rise is what gives this bread its distinctive flavor.
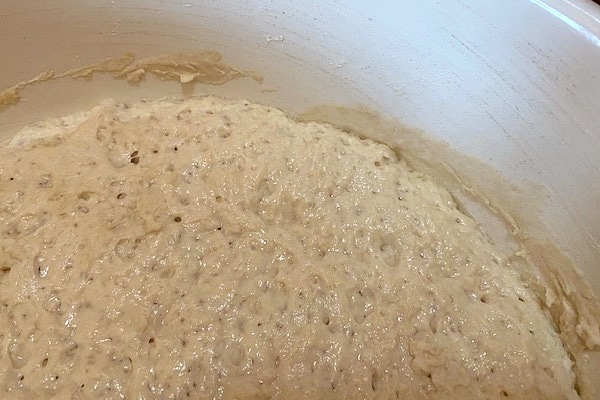
While you’re away, the yeast gets busy forming oodles of bubbles in the dough.
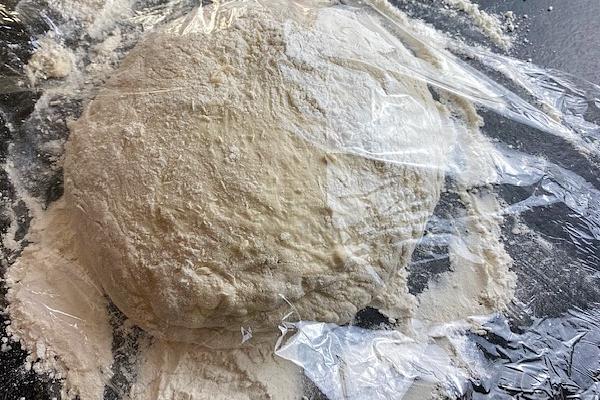
Then, when you’re ready, it only takes a few minutes to gather the shaggy, bubbly dough with floured hands and form it into a plump round loaf. Cover the loaf with plastic film and let it rest for about a half-hour.
Meanwhile, preheat your oven to 450 degrees. Put your Dutch oven with the lid on it into the oven to preheat right along with it. Both of them need to be very hot!
When you are ready to bake the bread, put the loaf on a sheet of parchment paper large enough that you can use it as a sling to lower the bread into the Dutch oven. Carefully take the Dutch oven out of the oven and put it on a heat-resistant surface.
Remove the lid and use the parchment paper “sling” to lower the bread into the Dutch oven. Replace the cover and put your beautiful rustic loaf of bread into the oven to bake.

Bake the bread with the cover for half an hour while the steam that forms works its magic. The steam gives the rustic loaf its characteristic texture.
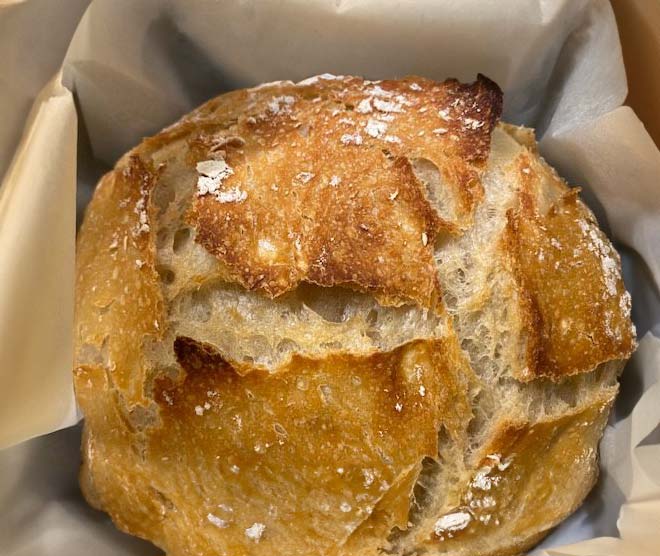
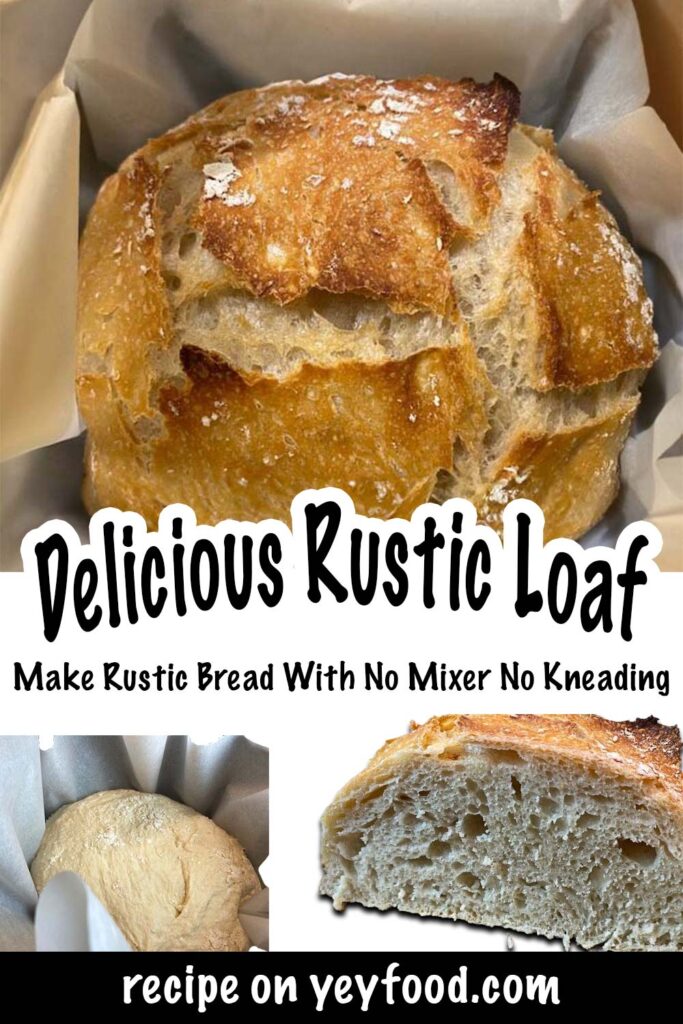
Finally, remove the lid and bake it for about fifteen minutes longer until the crust crisps and browns to a lovely honey-gold color. Voila! You have created your very own beautiful, professional-looking rustic loaf! Let it cool a bit before slicing it with a serrated knife.
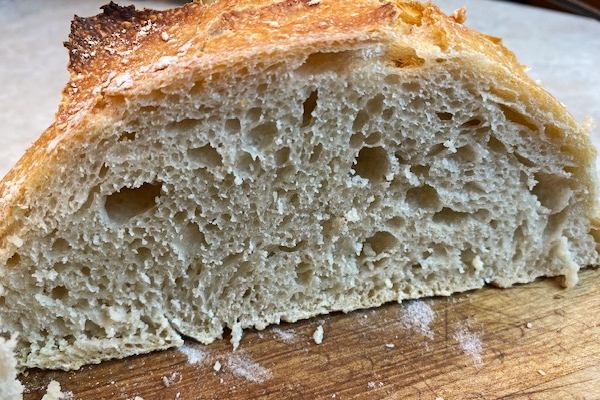
Just look at all those butter-catching craters! 😍 This bread is a perfect accompaniment for soup, makes wonderfully chewy sandwiches, toasts beautifully, and is ideal for a panini press! So easy you can make it often! My friends go crazy when I give them a loaf, and I love doing it!
No Dutch Oven No Problem Here Are Some Workarounds For You
Not every kitchen has a Dutch oven but don’t let that stop you from baking this glorious rustic loaf! The things a Dutch oven offers are tall, thick walls and a snugly fitting lid that holds the steam inside. The steam produced inside the pot is the key to creating the crisp crust and chewy middle.
The vessel you use needs to withstand 450 degrees in the oven. You can adapt any oven-proof stockpot, ceramic baker, casserole dish, roasting pan, or deep skillet. You can fashion a cover using a rectangle of heavy-duty foil secured to the edges of a pot without a lid.
I had someone tell me they used the insert from their crockpot with good results, but they are only rated to 400 degrees when I checked.
The finished loaf will be about an eight or nine-inch round and about six inches tall. I hope this will help you select a vessel to bake it in.
Chances are, though, that you will find loads of things you can do with a Dutch oven, and it may turn out to be a really good investment for your kitchen.
This no-need bread recipe has become an internet phenomenon because it’s so easy to make and turns out so professional-looking! Even someone who has no experience with yeast bread can create a delicious, gorgeous loaf.
We love to make yeast bread, and here are some of our favorite recipes! Best Butteriest Cinnamon Rolls, One Simple Yeast Bread Recipe, Dilly Bread, One Hour French Bread. What’s your favorite yeast bread?
Questions I often get asked about this recipe
Q: What type of flour works best for this recipe?
A: All-purpose flour works well for this recipe, but you can experiment with bread flour for a chewier texture. Whole wheat flour can also be used, but it might require more water and could result in a denser loaf.
Q: Can I use instant yeast instead of active dry yeast?
A: Yes, you can use instant yeast. Just reduce the amount slightly (by about 25%), and you don’t need to activate it in water first. You can mix it directly with the flour.
Q: How long does the dough need to rise?
A: The dough should rise for at least 12 to 18 hours at room temperature. The long fermentation time is essential for developing flavor and the right texture.
Q: What if I don’t have a Dutch oven?
A: You can use any heavy, oven-safe pot with a lid, such as a cast iron pot or a ceramic pot. Make sure it can withstand high temperatures.
Q: How do I know when the bread is done baking?
A: The loaf should have a deep golden-brown crust and sound hollow when tapped on the bottom. If you have an instant-read thermometer, the internal temperature should be around 200-210°F (93-99°C).
Q: Can I add herbs or other ingredients to the dough?
A: Yes, you can mix in herbs like rosemary or thyme, or even add ingredients like olives, cheese, or nuts during the initial mixing phase.
Q: Why is my dough so sticky?
A: This is a high-hydration dough, which means it will be sticky and wet. It’s normal for this type of no-knead recipe, and it helps create an airy, chewy texture in the final loaf.
Q: Can I let the dough rise in the fridge?
A: Yes, you can let it rise in the fridge for up to 24 hours. It will slow down the fermentation process and give the bread a slightly different flavor profile.
Q: How should I store the bread after baking?
A: Let the bread cool completely, then store it in a paper bag at room temperature for up to 2-3 days. You can also freeze it, sliced or whole, for up to 3 months.
Q: Can I double the recipe?
A: Yes, you can double the ingredients, but make sure you have a large enough pot or Dutch oven to bake the larger loaf. You may need to adjust the baking time slightly.
Printable Recipe:
Rustic No Knead Dutch Oven Bread
Incredibly easy rustic bread loaf with a crisp crust and chewy middle. No mixer, no kneading, no kidding.
Ingredients
- 3 cups all-purpose flour
- 1 1/2 cups warm water (about 110 degrees)
- 1/2 tsp fast rising dry yeast
- 2-3 tsp kosher salt
Instructions
- Mix the flour, salt, and yeast thoroughly in a large bowl, then add warm water.
- Stir with a wooden spoon until everything is combined, forming a somewhat sticky dough.
- Cover the bowl tightly with plastic wrap. Leave out at room temperature for 8 hours or up to 24 hours. The dough will bubble up and rise.
- When you are ready to bake it, preheat the oven to 450 degrees.
- Put your empty Dutch with the lid on into the preheated oven for 30 minutes, so it's nice and hot.
- While your Dutch oven preheats, turn dough onto a well-floured surface and, with floured hands, form the dough into a ball. It is not necessary to knead the dough; gently form it into a ball. Cover dough loosely with plastic wrap and let it rest.
- When the Dutch oven has preheated for 30 minutes, remove it carefully from the oven. Working quickly, place the ball of dough on a sheet of parchment paper and carefully place it in the Dutch oven. Put the lid back on the Dutch oven and return it to the hot oven.
- Bake the bread, covered, for 30 minutes.
- Remove cover and continue baking for about 10 or 15 minutes more until the crust is a beautiful golden brown.
- Watch to make sure the bread does not get too brown.
- Use the edges of the parchment paper to remove dough from the Dutch oven and place it on a rack to cool.
- Allow bread to cool slightly, then slice with a serrated bread knife and serve.
If you enjoyed this recipe, please share it on your social media! I would love for more people to try this delicious and easy-to-make recipe. If you have any questions or feedback, please feel free to leave a comment below. I would love to hear from you! Shhh… Join our secret foodie group on Facebook
More recipes from us:
Easy Christmas Cheesecake
Best Italian Wedding Soup Recipe
Christmas Cranberry Vodka Slush
More recipes from us
4 Reasons You Should Freeze Some Sweet Corn This Summer
How To Make The White BBQ Sauce That’s Fascinated Us Since 1925
Dilly Pickled Green Beans You Make In Your Refrigerator
If you like these recipes, you are our people! You can check some related articles below or search via categories on the right. But, be warned; you will be on here for hours. Enjoy!
So, please share this recipe on your social media accounts like Facebook, Instagram, Twitter, and Pinterest. We would be honored and ever so grateful; thank you!


Pingback: Make This Marvelous Meatless Minestrone For Someone You Love - yeyfood.com
Do you think the No Knead Bread recipe could be made with gluten free flour?
I have never made it with that flour. but I don’t see why not.
Where are the comments of people that reviewed this recipe?
I have only had questions and no comments from anyone who viewed the recipe on this site and went on to bake it. I have shared it with many friends and family members who have had great results. Do you have a question?
Do you really use only one half of a teaspoon of yeast? It seems like it wouldn’t be enough…
Amazingly enough, 1/2 teaspoon works perfectly!
Sorry, my previous question was incomplete. Notes before recipe say to preheat dutch oven with lid on. Recipe says to preheat uncovered dutch oven. Which is correct?
Wow Myrna, good catch! No one has asked that before, so thanks to you, I fixed the instructions and updated them. Thank you!!! The Dutch oven *and* the lid need to be preheated so it’s all hot and ready to receive the ball of dough to bake. I really appreciate your insight! You are a sharp cookie!
You can add a heaping tablespoon of rosemary to the dough – it is heavenly.
That sounds like an awesome idea! Thank you! I will try it!
What size dutch oven, 3 or 6 quart?
I have successfully used a Pampered Chef Dutch oven that’s 4 quarts. In the recipe, I say the loaf is about 6 inches tall, but that is as tall as it ever gets. It’s usually about 4 or 5 inches tall, so as long as you have that much depth, the vessel’s capacity doesn’t matter much.
Can an instant pot insert be used instead of a Dutch oven?
I think that would work just fine! Use the parchment paper “sling” to move the loaf in and out of the pot. Just make sure to cover the pot tightly with aluminum foil because the steam that forms gives the bread its deep cracks and gorgeous chewy crust. Uncover it for the last 15 minutes to brown. The only possible issue I can see is that the pot might be a little deep, which could inhibit browning. Please let me know how this works! I’m very interested.
What type of flour? Bread flour or all purpose? Can you use other flours?
I have only used all-purpose flour. I’ll amend the recipe to reflect that, thank you!!
I bake this artisan bread whenever we have homemade stew or soup. It turns out perfect every time. My grandsons could sit and eat the whole loaf at one sitting. We love the crunch on the outside and soft middle.
So easy isn’t it, and so rewarding?? Thanks a million for taking the time to make such a nice comment! Happy New Year!!
I made this recipe for the first time a couple nights ago. The bread stuck to the parchment paper during the baking process. Is there something I can do to prevent that? I’m new to baking but would love to improve!
The first thought that crosses my mind is to ask what kind of parchment paper did you use? I can’t seem to get an image to post in this comment section so I will email you. Also, did you put the shaggy, sticky ball of dough on the counter with some flour, roll it into a ball, and give it some time to rest before baking? Was your Dutch oven preheated and screaming hot when you put the loaf in it to bake?
I hope you’ll try it again, it’s so cheap, easy, and rewarding to bake. Please get back to me and don’t get discouraged.
I only have active dry yeast. Will that work too? If so do I need to adjust the amount of yeast? Recipe sounds so delicious!!!
That will work just fine! Good luck!! 😉
I thought I read somewhere that if you let it sit for 24 hrs it would be sour dough bread, but I can’t find that comment anywhere! Did I dream this?
Hi! I haven’t seen anything like that, Pam. The sourdough process is pretty slow to develop that characteristic “tang” in sourdough bread. You might enjoy making this artisanal loaf which is rustic and chewy. The mixture can sit on your counter for eight to twenty-four hours before baking, and it is super easy! It tastes and looks amazing!! https://yeyfood.com/make-this-beautiful-rustic-loaf-with-no-mixer-no-kneading-no-kidding/. I hope you give it a try and let me know!
Loved this bread. 1st time I made it, I added 2 1/2 tsp of salt. Recipe called for 2-3 tsp. The dough tasted too salty so to salvage it, I halved the recipe except with no salt and combined the doughs. The second time – I made 1 1/2 the original recipe with 1 1/2 tsp salt. The taste/texture was fine and the larger size still fit perfectly in the Dutch oven. I was happier to have the larger loaf. So original recipe is great. But perhaps less salt and consider the option of making 1 1/2x for size and with 1 1/2 tsp salt. Thanks for a great recipe – and so easy!
What a clever thing to do!! I love this bread and you just gave me a way to make a bigger loaf, what a smart cookie you are, thank you!!!! A bigger loaf? Heck, yeah!!
This is the best homemade bread recipes ever! My daughter tells everyone that I make the best homemade bread! 😊 as a busy mama I love that it’s simple, fast and delicious!
I am so tickled to hear that!! I could not believe how easy and fast it was but what surprised me most was its great bread!! Have a super happy Mother’s Day!
I just made this, and it’s GREAT! I’ve entered, and placed in a LOT of baking competitions, and I’d enter this anytime. Going to try a sourdough version of this soon, I’ll keep you posted on it!
Have you ever added anything to the loaf to amp it up? I saw someone mention rosemary, which is a spice I adore. But maybe buttering the top after you take the lid off and before browning? Or anything like that?
I haven’t but both of your ideas are great and I’d sure try them!! I do use a ton of butter on it though!! 😉❤
This is great. It turned out looking just like your photo and tasted yummy. Unfortunately, I didn’t have any kosher salt and used 2 tsp. of regular salt- too much! Next I’ll know to use less salt unless I get some Kosher salt. Also part of the bottom of my loaf burned a bit – what caused that? The pan? the oven? timing? It was minimal and easy to trim off, but wondered it anyone has any tips? I did use a dutch oven and parchment.
Thanks!!!
I’m glad your bread was so close to perfect on the first try! I hope you will keep baking it- it will become easier and easier! I looked up how to substitute table salt for kosher salt and found this: “Substitute half as much table salt for kosher salt. If your recipe calls for Diamond Crystal kosher salt (a chef’s favorite) but all you have is table salt, use half the amount listed in the recipe.” You could probably get by with one teaspoon of table salt, but the yeast needs some salt to grow.
As for the bake. Do you have an oven thermometer, so you know the temperature is 450 degrees when you set the oven to 450 degrees? That might be an easy fix. Otherwise, try moving the bread up one rack higher in the oven and watch the bake time! Good luck!
I just placed my first loaf of this bread in the oven and can’t wait to try it! I’m a little confused on the directions. On the website part of the instructions, you say to pre-heat the dutch oven along with the oven, but on the directions of the printable recipe, it says to pre-heat the oven and then pre-heat the dutch oven, which I think would be hard on the dutch oven to go from being cold to 450F. I pre-heated my dutch oven along with my gas oven to be safe. Will let you know how the bread turns out.
You did it exactly right! I”go back and amend the directions, thank you!!
Do let me know how the bread tuned out!
I made this recipe twice. It is definitely easy and has all the beautiful texture and crust that you want in an artisan bread. However, for me at least, the flavor left a lot to be desired. I expected a more yeasty, flavorful bread, but it just didn’t do anything for me.
That makes me sad to hear, its the first time I’ve heard that comment. Some people add garlic, herbs, or grated cheese to the dough, if you feel inclined, you might try that. I think I’m going to try replacing the water with beer sometime. Sorry.
I made this last week using King Arthur Flour recipe. Same recipe! Works great!
Yay!! Isn’t it amazing bread?
Made this bread for the first time and prepared the dough last night, let it rise overnight approximately 12 hours. For some reason it didn’t rise very much and didn’t let me form into a ball either, every time I try to shape it, It flowed back apart into a fladder shape. I used fresh yeast. I feel like there’s too much water in the recipe. Can you help?
I’m sorry but I am baffled. If you followed the recipe and directions,
3 cups all-purpose flour
1 1/2 cups warm water (about 110 degrees)
1/2 tsp fast rising dry yeast
2-3 tsp kosher salt,
you should start with a somewhat firm ball of dough. I even checked other recipes to make sure there wasn’t a typo. Did you use regular white flour? I have no idea how gluten free or other flour would work.
I can only suggest thet you reread the post, look at the pictures and try again. Let me know if it works. I’ve had many people tell me how easy it is and how even their first loaf came out.